Description
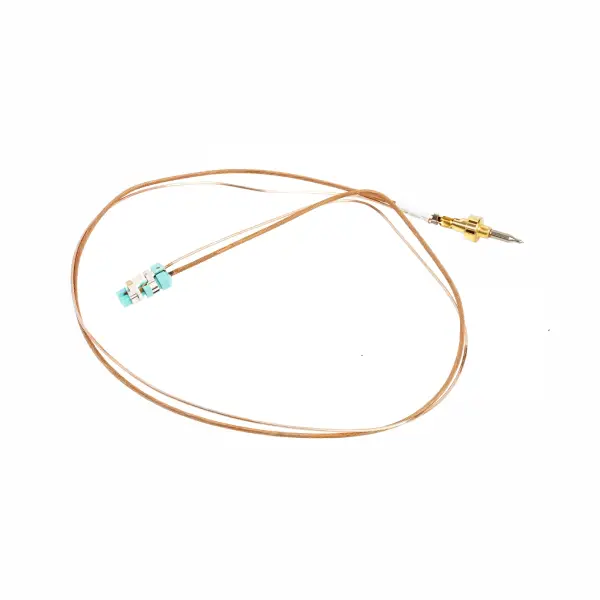
Original thermocouple for Whirlpool gas stove 481010566188
Genuine Whirlpool Gas Cooker Thermocouple 481010566188 is the safety component of Whirlpool gas cookers. It detects the presence of a flame and allows gas flow only when the flame is lit. The part is suitable for Whirlpool Group gas cookers and gas oven hobs, and comes as a fully certified original OEM part.
Stove that won't stay on? If you press the ignition button, hold it for a few seconds, and the gas still goes out as soon as you release it – the thermocouple is the first component to check. This is the most common fault in gas stoves and oven burners.
A moment before ordering – safety above all! To ensure a successful repair and maintain the longevity of the device, it is mandatory to use only original parts. Non-original parts may cause damage and a gas safety hazard. Now click the 'Check Model Compatibility' button at the top of the page and our system will immediately confirm that the part is suitable for you.
Why does the stove turn off immediately after you release the button?
The reason is almost always the same: the thermocouple is not generating enough voltage to hold the gas valve open. The thermocouple works on a simple principle – the heat from the flame creates a tiny electrical voltage (about 20-30 millivolts) that keeps the gas valve open. When the part ages or is damaged, the voltage drops below a threshold, and the valve automatically closes as a safety measure.
The most reliable sign of a malfunction: The stove will only turn on when you hold it down, but will turn off within 1-3 seconds of releasing it. If this is the case, the original thermocouple is the solution.
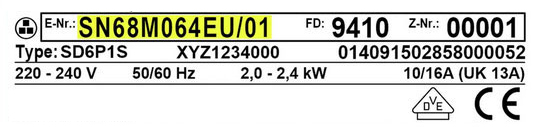
Locating the model sticker: The stove or control panel model sticker is usually located on the side frame, on the back, or under the stove body. For the oven – inside the door frame. Make sure the model number (E-Nr) matches the model list before ordering.
For all original Whirlpool spare parts on the plrom website.
Original vs. Unapproved Replacement – What's the Difference?
| parameter |
Original part (OEM) |
Unapproved replacement |
| Connector compatibility |
Precise – standard co-axial |
May require adjustments |
| Voltage generation |
Meets manufacturer's standard |
Not verified |
| Gas safety |
Whirlpool tested and approved |
Not verified |
| resistance |
Full product life |
Accelerated wear |
📋 Technical specifications
| attribute |
value |
| Manufacturer's SKU |
481010566188 |
| brand |
Whirlpool |
| Brand + MPN |
Whirlpool 481010566188 |
| Length |
520 mm |
| Connector type |
coaxial |
| Use |
Gas stoves and gas ovens |
| DIY level |
Requires basic disassembly – technician recommended |
✅ Compatible models
The part is suitable for the following models (make sure it matches the E-Nr number on the device sticker):
Whirlpool gas stove - AKM series: AKM 351/IX/02, AKM 351/WH/02, AKM 351/NB/02, AKM 352/IX/02, AKM 371/IX/01, AKM 373/IX, AKM 393/IX, AKM 394/NA, AKM 394/IR, AKM 513/IX/01, AKM 515/NB/01, AKM 515/WH, AKM 520/IX/01, AKM 521/WH/01, AKM 521/NB/01, AKM 521/IX/01
Whirlpool gas stove – AKT series: AKT 424/NB, AKT 466/NB, AKT 466/WH
Whirlpool Gas Stoves – HOB Series: HOB200AN, HOB210AN, HOB220AN, HOB230AN, HOB463B, HOB474B, HOBG10S, HOBG10W, HOBG11W, HOBG20S, HOBG21S, HOBG22S, HOBG23, HOBG30S, HOBG31S
Please note: This list is partial. To confirm full compatibility, use the 'Check Model Compatibility' button at the top of the page.
🔧 How do you replace a thermocouple on a gas stove?
⚠️ Important: Replacing a thermocouple involves work on a gas system. It is strongly recommended to call a qualified technician from the official service. Unprofessional installation may cause damage to the device and a safety hazard.
For a professional technician – the steps are:
⚠️ Safety: Turn off the gas valve before any work. Ensure good ventilation in the room.
- Remove the stove from its place (or work with full access to the bottom).
- Locate the thermocouple – it sits right next to the burner head, with a metal tip facing the flame.
- Loosen the connector (co-axial) on the other end of the thread from the valve.
- Turn the metal cap (usually half a turn) and pull out the thermocouple.
- Insert the new part, twist to lock, and connect the connector.
- Open the gas tap and check for leaks before lighting for the first time.
Our service team is available to coordinate professional installation – contact us and we will be happy to assist.
If there is a tutorial video for this model, we recommend watching it in the video tab below.
💡 Tip from the experts
From the experience of Daniel, our service specialist: Before replacing the thermocouple, check that the metal tip facing the flame is completely free of soot and combustion residue. Sometimes a short cleaning with fine sandpaper (P400) returns a “turned off” thermocouple to full function – and eliminates the need for the entire replacement. A one-minute operation that saves money.
❓ Frequently Asked Questions
What is the difference between a thermocouple and a thermostat on a gas stove?
Both are heating elements, but have completely different functions. The thermocouple is a flame sensor – it measures whether the fire is burning and allows gas flow accordingly. The thermostat regulates the temperature in the oven. If the stove doesn’t stay lit – the problem is with the thermocouple, not the thermostat.
How long does it take to replace a thermocouple on a gas stove?
For an experienced technician – about 15 minutes. Required tools: Torx or Phillips screwdriver, and sometimes a 9mm wrench for the metal cap.
Are all thermocouples suitable for all burners?
No. The main difference is the length (from 350 to 700 mm) and the type of connector on the other end. SKU 481010566188 is 520 mm with a co-axial connector. Must verify model before ordering.
🚚 Shipping Information | ↩️ Transaction Cancellation and Returns








 Plrom Electra service